
On this page
The information here will help you understand your injury, guide you through your rehabilitation and explain what you can do to maximise your recovery.
About your foot
Your foot is a complex part of your body. It has 26 bones in 3 sections.
Muscles, tendons and ligaments support the bones and joints of your feet so that they can support your whole body weight while walking, running and jumping. Despite this, trauma and stress can cause bone breaks or severe injuries in the foot.

The hindfoot
It has 2 bones. The talus bone which connects to the bones of your lower leg and the calcaneum bone which forms your heel. Fractures in your hindfoot, for example your heel, happen because of extreme force.
The midfoot
It includes the navicular, cuboid, and 3 cuneiform bones.
The forefoot
It has 5 metatarsal bones and 14 toe bones called phalanges.
A joint called the mediotarsal separates your hindfoot from your midfoot.
The Lisfranc joint separates your midfoot from your forefoot.
See the individual care plan for your type of fracture to understand more about your injury, treatment and how to recover.
Advice for a recent foot injury
In the first 72 hours, it’s important to:
- In the first 72 hours, it’s important to:
- rest your foot – you may have been told to keep all weight off your injured foot
- elevate it above hip level
- apply a cold pack regularly
- protect your foot by using crutches and a boot for walking
It’s helpful to remember PRICER:
- Protect
- Rest
- Ice
- Compression
- Elevate
- Rehabilitation
Medication
The Emergency Department (ED) or a Minor Injuries Unit (MIU) may have prescribed you with some pain relief. Take these as instructed to help manage the pain.
If you do not feel that this medication is helping, talk to us during your appointment in Fracture Clinic, or your GP, about an alternative option.
Cold packs
Ice is a great natural anaesthetic that helps relieve pain and controls swelling. Apply ice packs or a bag of frozen peas wrapped in a wet thin towel to your injured area for up to 15 minutes every few hours.
- Do not place ice in direct contact with the skin.
- Do not leave the ice pack on for more than 20 minutes at a time in one hour.
Rest and elevation
It’s important to rest your injured area as much as possible in the first 24 to 72 hours.
It’s normal to experience swelling after your injury which is often worse at the end of the day.
Elevation reduces swelling, which in turn relieves pain and speeds up your healing. Keep your injured area elevated as much as possible during the first 24 to 72 hours.
If you have been given a sling, use it to keep your injured area elevated. You may find it more comfortable to use pillows to elevate it during the evening and at night.
If you have a lower limb injury, try to keep your feet elevated above the level of your hip.
Smoking
Medical evidence suggests that smoking prolongs fracture healing time. In extreme cases it can stop healing altogether. Stopping smoking during the healing phase of a fracture will help ensure optimal recovery from this injury.
For advice on stopping smoking and local support available, please discuss this with your GP or go to the NHS Better Health website.
Helping your recovery
Being healthy can help you recover from your injury faster. Eating well, staying hydrated and keeping as active as possible will all help. We’ve put together a set of videos on all the things you can do to help you recover as quickly as possible.
Care plan
Below we have a care plan, including information that will help you understand your injury, guide you through your rehabilitation and explain what you can do to maximise your recovery.
Your diagnosis should have been made by an orthopaedic consultant or one of the team working under the supervision of the consultant team. The information in this care plan is to help you understand your diagnosis and is not exhaustive.
Non-urgent advice: Please note:
Your consultant may give you a different, personalised care plan based on your injury and whether you need imaging (x-ray, CT scan, MRI, or an ultrasound) or an operation.
What is your injury?
You have either fractured or dislocated one of your toes. Fractures of the toe are among the most common lower limb fractures. They’re most frequently caused by a crush injury or axial force such as ‘stubbing’ your toe.
Healing
This injury normally takes up to 12 weeks to heal, but this may differ depending on your individual circumstances.
Follow up
Unless you have injured your big toe, injuries like yours usually heal well on their own over time. Most people won’t need a follow-up but if you do, we’ll contact you by phone. If it’s your big toe, our Emergency Department (ED) will refer you to our virtual Fracture Clinic where we’ll review your injury. You should get a letter from the virtual Fracture Clinic telling you more about your injury.
If you feel you’d like to see someone, you can book an open appointment at any time in the 6 months after your injury. Please call 01736 758892 to make an appointment.
Please contact the Fracture Clinic on 01872 253091 if:
- you’re unable to follow this rehabilitation plan
- you have any questions
- you experience pain and swelling after 12 weeks
- you experience pain or symptoms other than at the site of the original injury or surrounding area
- the tape or strut from your buddy strapping peels or loosens.
Your rehabilitation plan
For the first 3 weeks after your injury:
- wear the boot for comfort – it’s not needed to heal your fracture but will help settle your symptoms
- early weight bearing (putting weight through your injured foot) helps increase the healing speed, so try to walk as normally as possible
- you may find it easier to walk on your heels
- use crutches for walking if we have given them to you
- take the boot off at night to wash and when resting at home
- start the initial exercises below immediately to get your movement back
- you may have your toes buddy strapped.
Buddy strapping stops your injured toe from moving by strapping it to an uninjured toe.

Between 3 and 6 weeks:
- remove the buddy strap after 3 weeks
- stop using the boot and walk without crutches (initially in the house)
- continue with the exercises to regain flexibility in your foot and ankle
- wear the boot for 6 weeks if you have pain without wearing it after 4 weeks.
From 6 to 12 weeks:
- resume day-to-day activities but respond to any pain you might experience
- you can expect to have a healed injury
- you may experience some mild pain and swelling for 3 to 6 months
- heavy tasks or long walks may still cause some discomfort and swelling
- you may want to try the exercise below labelled ‘after 6 weeks‘.
Exercises
Follow the exercises below without causing too much pain. This will prevent your ankle and foot from becoming too stiff and help the healing process. It will also promote circulation and reduce the risk of developing a blood clot (Deep Vein Thrombosis, or DVT).
Initial exercises to start straight after your injury
Do these initial exercises for ankle and foot range of movement 4 to 5 times a day.
Repeat each of the following 10 times.

Step 1: Point your foot up and down within a comfortable range of movement.

Step 2: With your heels together, move your toes apart to turn your foot outwards. Do this gently as long as it’s comfortable for you
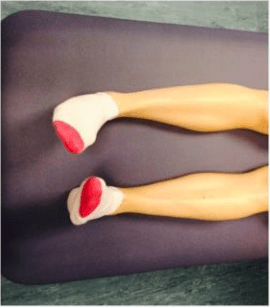
Step 3: Turn the feet in towards each other as in the picture, keep the legs still, moving from the ankle only.
After 6 weeks
Stand up and hold onto a solid surface. Rise up onto your toes using both feet then progress to one foot. Only do this as comfort allows.
More information
You can find out more about toe fractures and dislocation, and see demonstrations of the exercises in this video from Brighton and Sussex University Hospitals.
Using your boot and crutches
Wear your boot and use your crutches as instructed in the care plan for your injury above. This video shows you how to fit and wear your boot.
Boot advice for people with diabetes
If you’re diabetic, please contact the Fracture Clinic on 01872 253091 to discuss your boot. It’s important if you have problems with your skin. We can provide you with a specialist diabetic boot.
Footwear for your uninjured foot
Choose a supportive shoe or trainer with a firm sole for your uninjured foot. You’ll notice that your boot has a thicker sole. By matching this height on the uninjured side, you’ll reduce stress on your other joints.
You can buy an adjustable shoe balancer to match the height of your injured side.
How to use crutches
These videos show you how to use your crutches.
What should I do with my boot and crutches when I no longer need them?
We can’t use the boot again. You should not return it to the hospital.
You can return crutches to the Fracture Clinic or your local physiotherapy department.
Preventing complications
Caring for your wound and stitches
If you’ve had an operation, you’ll need to keep your stitches dry and clean. You should also look out for any redness or signs of swelling, bleeding or pus as these can be signs of an infection.
You can find information about how to care for your stitches, if/when they need to be removed and signs of an infection on our surgery for fractures and soft tissue injuries page.
Blood clots and Deep Vein Thrombosis (DVT)
Because your limb is immobilised and you’ll be moving less than normal, you’re at higher risk of developing a blood clot or Deep Vein Thrombosis (DVT). This can be life threatening if left untreated.
Symptoms of DVT in the leg are:
- throbbing or cramping pain in 1 leg (rarely both legs), usually in the calf or thigh
- swelling in 1 leg (rarely both legs)
- warm skin around the painful area
- red or darkened skin around the painful area
- swollen veins that are hard or sore when you touch them.
These symptoms can also happen in your arm or tummy if that’s where the blood clot is.
More information about DVT
- Watch this video about how to prevent DVT.
- Learn more about DVT including symptoms, who is at risk and how to treat it.
- Find out how to reduce the risk of blood clots when you have an immobilised lower limb (PDF, 108 KB).
Preventative medication for DVT
If you have been told not to put any weight through your leg or to partially weight bear (50%), you should have been assessed in ED or MIU and told if you need to take preventative medication.
If you have not had this conversation please call your GP for an urgent appointment.
Depending on your injury, you may have been prescribed a course of a blood thinner. There are a few different types of medication and they often need injecting into your tummy. You can discuss an alternative with a doctor. Please see the relevant care plan for your injury.
Pressure sores and ulcers
Wearing a boot or plaster cast combined with not moving your limb can lead to pressure sores or ulcers. These are injuries to the skin and underlying tissue caused by prolonged pressure, rubbing or tension.
They often develop gradually, but can sometimes form in a few hours.
Signs and symptoms of pressure sores
These include:
- skin discolouration – red patches for people with pale skin, purple or blue patches for people with dark skin
- discoloured patches that do not turn white when pressed
- a patch of skin that feels warm, spongy or hard
- pain or itchiness in the affected area.
If you have a boot, take it off every day to check your skin and make sure it’s not rubbing.
If you have a plaster cast, look out for a change in colour (red or white) of your skin above or below the plaster, an increase in pain inside the plaster or pins and needles.
- Watch this video to learn how to prevent pressure sores.
- Read more about pressure sores on the NHS website.
If you think you have a pressure sore or ulcer call the Fracture Clinic straight away on 01872 253091.
For out of hours advice please call 01736 758909.
Sepsis
Sepsis (also known as blood poisoning) is a serious infection that can be life threatening. There is no one sign for sepsis so it can be hard to spot.
Call 111 immediately if you develop any of the following:
- Slurred speech or confusion
- Extreme shivering or muscle pain
- Passing no urine in a day
- Severe breathlessness
- It feels like you’re going to die
- Skin is mottled or discoloured.
Find out more about the symptoms of sepsis on the NHS website.
These videos also explain what sepsis is and how to spot the early signs.
Living with your injury
Work
Decisions to return to work are made on a unique basis and should be discussed with the Fracture Clinic, your GP, and your employer.
You may need time off work and when you return, you may need light or amended duties. When you should return to work will depend on your profession and your injury.
If you see us in person at the Fracture Clinic we can give you a fitness for work statement or a sick note. If you don’t come to see us, you can also get one from your GP.
Driving
If you have an injury to a lower limb (foot, ankle, or knee), you can return to driving when you:
- have been told you no longer need your brace, boot or crutches, or your plaster cast has been removed
- can walk comfortably
- can perform an emergency stop pain-free.
Always test your ability to drive with the ignition off and in a safe environment.
If you have a follow-up appointment with us, please wait until your consultant or physiotherapist has given you clearance to drive.
If you’re in any doubt, do not drive until you have spoken to our team.
Sport
You should not do any sports at all for at least 6 weeks.
You must avoid impact sports, jumping, running, dancing, and heavy lifting for at least 12 weeks.
Some injuries will mean you have to wait longer before you can return to sport or impact activities. Please check your specific care plan. If you’re unsure about whether you should do a sport or activity, please call the Fracture Clinic on 01872 253091.
Page last reviewed: 2 October 2024